 It doesn’t take much to convince me that making something yourself is always better than store bought… This is also true for Butter. After making it once in my KitchenAid Stand Mixer, I couldn’t believe my taste buds – It was so creamy and full of flavor! Plus, the byproduct when making butter is Buttermilk… perfect for those who use Buttermilk or Starter for cultured dairy.
Here’s How to Make REAL Butter using a KitchenAid Stand Mixer at home in less than 10 minutes.
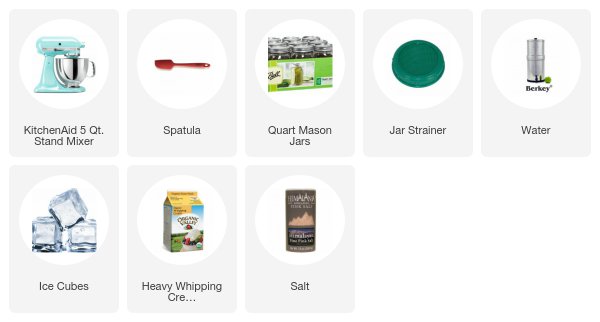
The Tool & Ingredients Used in this Recipe:
For more info about cultured dairy, yogurt & cheeses visit Cultures for Health.
Print
How to Make Butter in a KitchenAid Stand Mixer – Real Butter Recipe
- Prep Time: 10 minutes
- Total Time: 10 minutes
- Yield: 1 cup 1x
Description
You can make your own REAL Fresh Butter in less than 10 minutes in your KitchenAid Stand Mixer! This Step-By-Step Recipe & Video will show you how.
Ingredients
Scale
- 2 Cups Raw or Pasteurized Whole Whipping Cream
- 2 Quarts Ice Water
- Salt, Seasonings, or Herbs to Taste (optional)
Instructions
- Optional: 1/2 hour before beginning, remove Whole Whipping Cream from fridge and let sit on kitchen counter to speed up the separation process.
- In your KitchenAid Stand Mixer, pour whipping cream into mixing bowl.
- Using the Wire Whisk/Whip Attachment, and Splash Guard (if you have one), begin mixing the Cream. Start on Speed 1 and work your way up to 10. You may need to hold a kitchen towel over the openings to prevent excess splashing.
- In approximately 3 minutes you will notice the butter fat separating from the buttermilk. Once the butter fat coagulates and sticks to the whisk, you can drain off the buttermilk into a mason jar for later use.
- Pour approximately 2 cups of your ice water over the butter, into the mixer, and rinse the remaining buttermilk out of the butter by running mixer on medium speed. Be sure to use your kitchen towel to cover up any open areas to avoid splashing.
- Once again, drain the excess water at the bottom of the mixing bowl – this time draining it in the sink. (there is no more usable buttermilk from this point on).
- Repeat the cold water rinse (3-5 times), until water is clear after mixing. Drain any remaining water into sink.
- Using your spatula, loosen the butter from the whisk and press butter fat onto the side of the mixing bowl to remove any excess water.
Notes
- This recipe makes approximately 1 Cup (8 ounces or equivalent to 2 Sticks) of Butter, but feel free to scale it in half if you don’t need so much. It also makes approximately 1 Cup (or 8 ounces) of Buttermilk.
- Butter with water left inside of it, will spoil very quickly – so be sure to remove as much water as possible. Some people even press their butter with a cheese cloth to ensure maximum water removal.
- Once all water content has been pressed out of the butter, you may mix in salt, seasonings, or herbs to your taste.
- If you don’t plan to use the butter immediately, you can store it in the fridge for up to 2-4 weeks in an airtight container. You can achieve longer storage times in the freezer – just be sure to protect your butter from freezer burn by storing it in an airtight container.
Nutrition
- Serving Size: 1 Tablespoon
- Calories: 102
- Sugar: 0 g
- Sodium: 0 mg
- Fat: 0 g
- Saturated Fat: 0 g
- Unsaturated Fat: 0 g
- Trans Fat: 0 g
- Carbohydrates: 0 g
- Fiber: 0 g
- Protein: 0 g
- Cholesterol: 0 mg


Many Mahalos! :)
Hi there, really enjoy your site! Have you tried making butter in the vitamix? I just saw the recipe in the book it comes with so I was going to try it soon!
Yes, but because the VitaMix heats up very quickly, you have to be really careful or you can ruin the whole batch. It’s best to start with a cold container & whipping cream. I like how the butter turns out better in my Stand Mixer, but clean-up with the VitaMix is sooooo much easier! =) God Bless! ~Erika
I’m just wondering how I could add flavoring to the mix, would I just add it in with the whipping cream before I start mixing? I love how simple you make it to follow your instructions, by the by. I’ve already suggested your website to friends of mine! Thank you!
Hi Bree!
Thank you for the sweet comment! =) If you want to add flavoring to the butter, add it after you have made the butter and pressed all of the water out. If you add the flavoring before, the cream may not separate properly and much of your flavor would be washed away during the rinses. Hope that helps!
God Bless!
~ Erika
Hi. Looking for videos on YouTube about making butter at home, I ran across your video which was very well presented, organized and seemed to be the best illustration I’ve viewed thus far. Noticing that you own a KitchenAid food processor, I was wondering if you have ever tried making the butter with that. There are videos posted on YouTube presenting both options. I saw that you had tried with the VitaMix but if you’ve used the KitchenAid food processor for butter making, I’d appreciate your review of that process. On another note, you have a lovely family and it makes my heart swell to see families grown through adoption. I was a foster mom to around 30 newborns and several children 3 and under over a 6 year period and know what it’s like to place that new baby in a mother’s arms! God bless you and your husband for growing your family through adoption! And thanks for taking time out to help people like me who desire to start making healthier food choices!
Hi Wendy!
Thank you – Your comment is so lovely! What an amazing person you are to care for so many little ones! Being a foster mom is a special gift that not everyone can handle… clearly God has blessed you tremendously!
I have never attempted butter in the Food Processor, although I suspect the process isn’t all that different. The processing times would probably vary and you may need watch the temp of the cream. Otherwise, I’m sure it would work great! If you try, let me know how it goes!
Thanks again & God Bless!
~ Erika
I just made the butter (thanks for the site) but I’m wondering if I can leave it out on the counter like I can with my store bought butter? Thanks!
Hi Danae!
Thank you for the comment… I’m not sure how this butter would do on the counter since I’ve always stored it in the fridge. Like real butter, this recipe is pure butter fat and ‘should’ be ok. However, since this is not commercially produced, there may be a little extra water content in it that could cause it to spoil quicker if left out. I’ve noticed, that it doesn’t take long to soften when left out, so perhaps that will work for you too. =)
God Bless!
~ Erika
Hi Erika,
This is the first thing that I have made with my new kitchen aid mixer and it turned out great! I am going to make my daughters wedding cake and I want everything to be made from scratch including the butter! My question to you is… what do you do with the butter milk that is drained off?
Hi Heidi!
Yay! Congrats on the new KitchenAid & your daughters wedding! =) The buttermilk is excellent in pancakes, waffles, biscuits, or any other recipe that calls for it. If you’re familiar with culturing, you can culture it for the beneficial bacteria which helps with leavening. A great resource for learning about culturing dairy is CulturesForHealth.com Hope that helps… God Bless! ~Erika
Loved the video! How much salt do you use to make salted butter?
Thank you,
Kelly
Hi Kelly, I’d start with a pinch or two and adjust according to your taste. I typically add the salt after the final rinse & pressing so you don’t lose the flavor. Hope that helps… God Bless! ~Erika
Hi when I attempted this, the butter did not separate, it stayed as like a whipped cream. What did I do wrong? Thank you
Hi Erika, I just temped to make butter with my new Kitchenaid and with raw cream and it never thickened, I think I left it out to long on the counter. It’s pretty cold were we live and inside temp is about 65-68. I left it out for 5 hrs. After watching your video I see I had to much in the bowl also. I was reading and someone said that some times in the winter the cream does not have enough fat in it to make butter. I think you know what your doing and I need help, I think I waisted about 5 cups of cream.
Thanks, Venus
Made the butter. Looks great. However, it had air pockets of water that I spent quite some time smooshing out with a knife. I got most of it out. I think. It kept bleeding droplets of water and I just want reassurance that it’s gonna be ok. It’s in the fridge right now. I know it’s safe and all and I’ll be sure to use it first…but is a smidge ok water ok? Just to mention, I lost about 2 tablespoons of my butter to attempting the cheesecloth…
I picked up some Bittle “paddles”…ribbed beach wood. It helps press all the water out and does this cool textured design on the butter. Plus, it’s kinda fun.
Awesome, thanks! Yet another thing I can’t wait to make with my new stand mixer!
Came here from the video and all your pictures that are hosted by Flickr are broken. You need to re-link them. Enjoyed the video.
Hi Erika,
Thankyou for your step by step video, it’s so helpful & straight to the point.
I too found it a bit difficult to squeeze all the liquid out, Butter looks great & can’t wait to use it.
Just a heads up, I did use a food processor, which virtually eliminated the problem with splattering, as opposed to a mixer. Butter was ready in a matter of minutes, but, I did use the cream straight from the fridge ( as opposed to room temperature)
Can coconut milk or almond milk be used to make butter somehow?
★★★★★
Hi thank you for this fantastic recipe! I would like to mold this butter into a turkey for thanksgiving! Any tips or ideas you’ve tried for molding butter?
Hi Laura, What a fun idea! I have never molded butter before, but I know that the time to mold it is right when you make it (when it’s still soft). Then I’d freeze the mold until the shape is hard enough to pop out. If you do it, I’d love to see a picture! =) God Bless! ~Erika
Today I had a snow day and new KitchenAid Mini standmixer. What better to make than butter!
However, it took me way longer than 3 minutes for the butter fat to separate. I seriously thought I was never going to get it there. Is that because I used heavy whipping cream instead of whipping cream? Or because I have a mini stand mixer? I seriously thought I was going to burn the motor out it was taking so long.
Either way the butter is fantastic and I can’t wait to do it again!
Hi Diane! Aren’t snow days the best for hanging out in the kitchen to try new recipes? =) It may have taken longer for the butter fat to separate if your cream was ice cold. I typically leave mine out on the counter for an hour or so before whipping – it speeds up the separation process. God Bless! ~Erika
Erika-
I tried again today using whipping cream instead of heavy whipping cream and he process was much quicker. I do think it makes a difference! I’m now a fresh butter convert because of you!
Such a great process, Erika.the recipe looks good.our all member’s liked it.some of them took this formula for making it in home. Keep posting this type of recipes.. :)
Hello! Last month (December) with lots of whipped cream in the house, we played with making butter in a mason jar for the first time ever. It was fun and worth it since we thought that the homemade butter tasted better. It was a lot of hard work though!
Today, faced with *a lot* of Darigold brand heavy whipping cream (40%), destined for the freezer I wondered how I could go about making butter in my KitchenAid Pro mixer. Then I found your YouTube video!!
THANK YOU so much for your clear explanation on the how/why of doing this process. (Now, I also know why some butters weep when I cream it for baking.) Also I’d like to mention that it seems that if heavy whipping cream is used as opposed to the regular, it yields much more butter. (I’m presuming it is due to having more fat.) I was able to get 2/3 butter 1/3 buttermilk!
Thanks again, butter on! :)
P.S. I love your site, and I’m bookmarking it for more of your great info!
★★★★★
If you make this as a “last resort” type of thing as your whipping cream is about to go bad, does that affect the length of time that the resulting butter would be good for? While we’re on the subject, if you use old milk or whipping cream in a recipe that doesn’t get baked (icing?) should you then consider the icing to be equally close to expiring?
★★★★★
Jacob, I don’t’ know how long the butter I mentioned above will last. I froze half of what I made that morning just to be sure (in small 2 oz portions) and we had some last night and it is still yummy, as I figured it would be. It tasted as good as the one we made in December with fresh heavy cream via the Mason jar. (I am not making a habit of this, I needed a way to use it, and wanted to give this a try.)
On your whipping cream for icing/frosting question I’d say yes. Say if the cream was about to turn in 3 days, as a non-baked icing/frosting it would go bad in 3 days. Maybe sooner even! I figure just because it is whipped doesn’t mean that it lengthens the expiry date. *However* if you froze it, then I think that, like freezing my butter it will extend it just long enough to remain tasty, useful and safe. (I have not suffered any ill effect anyway!)
Hello, I’m wondering which KItchen Aid stand mixer you have? I’m looking into purchasing one (right now I’m just shaking the cream in a bowl with a lid, it works also but is tiresome) There are quite a few different style of Kitchen Aid mixers so I’m not sure which style I need. Thanks for your help!
Marieke
I made butter this afternoon in my Kitchenaid mixer. I’ve made it before in a blender, but this was so much easier!. Made biscuits tonight just so I could eat butter!
★★★★★
Nice instructions…a correction though. The by product is not buttermilk….buttermilk is a cultured dairy product. The by product from butter is basically similar to skim milk. All the fats and solids are gone. That is not buttermilk. Buttermilk is loaded with fat and like I said it is cultured using rennet or a culture to ‘ferment’ it.
★★★★★
This is absolutely buttermilk….that’s why it’s called buttermilk. It’s the by-product of making butter.
This is a great blog. This is very informational. I like your recipes. Thanks for sharing your recipes with us. Keep up the fantastic work.
This is really cool. I really wish I had a kitchenaid mixer to try it. I’m curious about the shaking method that you used. Do you think it would work with a larger amount? How long did you shake it for?
Hi Suhana! When my husband and I tried the jar-shaker-method I think we used a pint sized mason jar and filled it up half way so that the heavy whipping cream that we used would have the space to “churn” into butter. (I’d say we did this test with 1 cup?) We had to shake it for what seemed to be a looong time but maybe it was about 15 minutes or so, and we took turns. I’ve read that to speed things up you could put a clean marble in the jar, but we haven’t tried this.
A friend of ours does not have a stand mixer but has made butter successfully in his food processor, and also with his hand mixer. Maybe either of these could work for you? ~Karen
That is very informative. Thanks for sharing it with us.
★★★★★
very nice video…I’ll be making butter tomorrow…I didn’t know it was so easy, your
Turned out excellent I used quart of heavy whipping cream my kitchenaid mixer took about 10 minutes or soul rinse it with ice water 4 times tried pressing water out of it in then I put it in a cheese cloth I squeezed it and letting a drain a find out how it tastes tomorrow but it looked pretty good
★★★★★
I’ve made butter on a couple of occasions following your video but this time it took 15-20 minutes to make first batch and then the second was going on 20 minutes and was still only whipping cream stage and this was a heavy cream that I had used in the past with no problems. My cream was at 55 degrees when I started the second batch. Could this have been too warm? Any help is appreciated. By the way I just covered the whipping cream in the mixing bowl for tomorrow and I’m hoping it was too warm.
★★★★★
When I was on my farm I used the heavy cream from my cow and made the butter in my blender. My cows cream was so rich that it was the only thing in the blender. There was no water to drain from it. And then I added the salt. There was only one cow’s cream that I could do this with and it made the best butter. Have never had any butter that good since then. Enjoy you ideas and recipes. Thank you for sharing.
Such A Great Blog. Thank U For Sharing Useful Information Abou how-many-cups-is-one-stick-of-butter .
This Article Really Amazing And So Much Helpful For Me. Keep It Up. Thanks.
I love this recipe. The only changes I made were to substitute 1/2 oat milk and 1/2 regular unpasteurized raw cream. This makes it just as tasty but safe for my gluten free DH. We prefer to use a little fresh thyme or rosemary or mint from the garden to add some flavor with just a scant teaspoon of flaked sea salt. Very tasty, thanks again,.
★★★★★
When do you add the salt of cinnamon sugar to the butter?
★★★★★
Hi Erica, I wanted to let you know that when I go to click on your “about you” it comes up for someone by the name of Shannon. I click on “a little insanity” and it also comes up Shannons gluten free recipes., Somehow they have interconnected your site with hers. Just thought I would let you know. I am however, going to definitely try this recipe. Can’t believe it is so easy! Thanks for posting.
Thank you so much for this recipe. Super simple and well explained. The butter was delicious!
★★★★★
Hi Erica, I’ve wanted to make butter and I’ve had a KitchenAid stand mixer forever, I watched someone else on Instagram try to make butter from store-bought whipping cream but it didn’t turn out but I really wanted to try to make butter. I found Land O Lakes rich and creamy heavy whipping cream and it wasn’t pasteurized at all and I figured well that should work. And let me tell you it worked and you are a great instructor, clear, concise instructions and I made butter and I can’t tell you how happy I am that I could do this. This will not be the last time I make butter. It is so easy I wish I tried it sooner. I have an 8 quart mixer and the whip was a stinker to get the butter out of, next time I’ll take the butter out and run the mixer and see if the rest of the butter will come out of the whip completely.
★★★★★
Great Job. Sharing such an nice content and recipes. Very accurate recipe about HOW TO MAKE BUTTER IN A KITCHENAID MIXER RECIPE. Keep Writing
Thanks..!
Well, I accidentally made butter tonight because I wasn’t watching closely enough. I always clarify my butter, getting it a bit brown, so that takes care of removing the water.