 When I think of eating Beef Jerky, I think of a bunch of cave men sitting around with their clubs, gnawing off a hunk of freshly killed dinosaur. But in reality, I know Beef Jerky is an easy way to make a great protein packed, portable snack… which technically does requires a bit of gnawing. :P
As you know, I’m not the biggest meat lover on the planet, so this Gluten Free Beef Jerky Recipe had to be easy, natural, taste great & be gluten free! I also didn’t want a huge meat mess in my kitchen or dehydrator, so I also came up with a minimal clean-up option for using your oven – which is especially nice if you don’t want to cross contaminate your dehydrator with a meat product.
Sure you can buy pre-packaged beef jerky, but it’s outrageously expensive and not as natural as you think. In order to keep the beef jerky shelf stable, there are often hidden preservatives, excess salt, artificial flavors, MSG & the possibility of gluten contamination. When you make beef jerky yourself, you know it’s fresh and you also have the option of buying grass fed & hormone free beef (from local farmers if possible) for an even better end result.
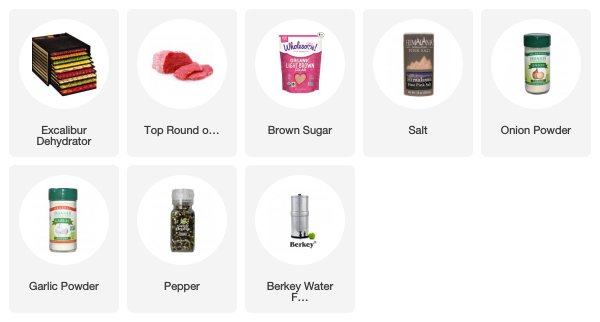
The special tools & ingredients featured in this recipe are:
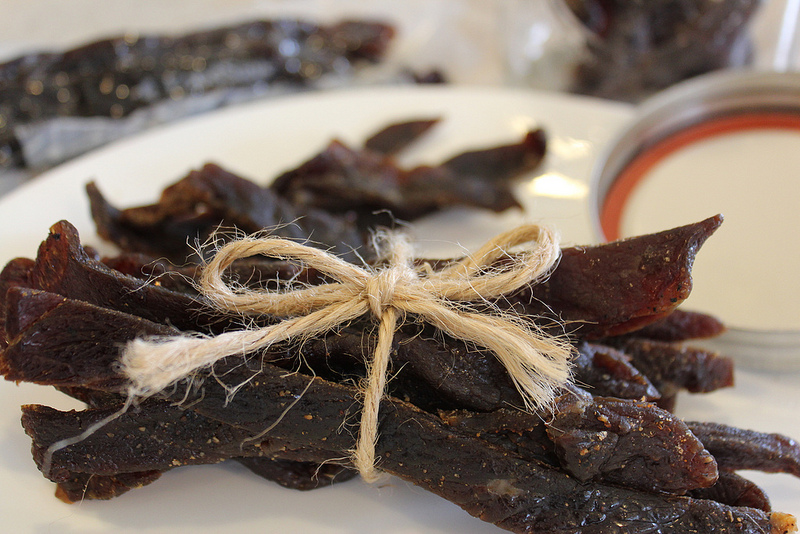
BEST Gluten Free Beef Jerky Recipe
- Prep Time: 10 mins
- Cook Time: 8 hours
- Total Time: 8 hours 10 minutes
- Yield: 1 pound 1x
- Category: Snacks
- Cuisine: Gluten Free
Description
This Gluten Free Beef Jerky Recipe is the perfect snack when you’re on the go, or post workout. It’s easy to make & delicious!
Ingredients
- 1 Pound Top Round Beef or Rump Roast – sliced thinly (mine are typically about 12″ Long x 3″ Wide and approx. 1/4″ thick). I use only organic, local, grass fed beef and our meat department cuts it into strips for me.
- 1/4 Cup Brown Sugar (firmly packed) or a Sugar Substitute (like Maple Syrup or Date Sugar)
- 1 1/4 teaspoon Salt (I use Pink Himalayan Salt)
- 1/2 teaspoon Freshly Ground Pepper
- 1/2 teaspoon Granulated Garlic
- 1/2 teaspoon Granulated Onion
- 3–5 Tablespoons Water
- For an extra kick, feel free to add in some pepper flakes, Sriracha, or hot sauce of choice – be sure it’s gluten free if that’s a concern for you. Remember that flavors concentrate when dehydrated, so don’t over do it!
Instructions
- Mix together all of the ingredients in a bowl big enough to accommodate your meat.
- Once everything is well mixed, add your strips of beef and make sure each strip is coated well. Be sure your hands and work surface are clean… I use a disposable rubber glove for sanitary purposes & because I hate touching raw meat. =)
- Take your strips of beef, and put them in a Gallon Ziplock Bag. Remove as much air from the bag, seal it well, and place it in the Refrigerator for 12-24 hours to marinate. Or, for a more intense marinade, use your Food Sealer to remove the excess air & seal the meat.
- After marinating, remove the beef from the bag and dehydrate according to the directions below for either an Oven Method or Dehydrator Method:
OVEN METHOD:
- Don’t skip this step! Line the lower rack of your oven with aluminum foil, being careful not to wrap the sides so you can slide it in and out of the oven with ease. This takes less than 2 minutes, and will save you hours of clean-up & protect the lower heating element. Replace the foil lined rack to the lowest rack possible – right above the lower heating element.
- If your top oven rack is really dirty, wash it well before placing the beef jerky on it. You don’t want to cross contaminate the jerky with any bad bacteria or old food. Once your rack is clean, run the broiler for 5 minutes to kill any bacteria inside before beginning.
- Preheat oven to the lowest temp… which in my case is 170 degrees, but don’t go lower than 155-160 otherwise you run the risk of dangerous bacteria growth. Any higher, and you end up cooking the beef jerky and not dehydrating it – which is what makes it shelf stable and edible.
- Hang the strips of marinated beef over the top rack grates, spacing the meat so that there isn’t any overlap. The more space between the strips, the faster and more efficient the drying will be.
- Depending on the thickness of the meat slices, dehydration will take anywhere from 5-8 hours. The meat will turn from red, to light brown, then to a dark brown color when it’s done. You really want to be sure the meat is completely dehydrated, but without turning it into shoe leather.
DEHYDRATOR METHOD:
- I LOVE my Excalibur Dehydrator and it does an amazing job dehydrating beef jerky… But, I personally hate the mess, clean-up & sanitation required to make beef jerky in it – and then running the risk of cross contaminating my raw foods I often make. It is definitely more time consuming than the Oven Method, but will work well either way.
- Begin by making sure your dehydrator & trays are clean & sanitized – you don’t want to risk contaminating your meat with bad bacteria.
- Set the dehydrator temp to 155 degrees (the highest setting)
- You can either use the trays to hang the strips of beef, or lay them flat on your screens. Either way, I highly recommend lining the bottom of your dehydrator with a layer of foil, or a tray to make clean-up easier.
- Let the meat dehydrate until done, being sure to rotate the trays as needed throughout the dehydrating process – about every hour or so.
- It takes approx. 6-10 hours to finish dehydrating depending on the thickness of your meat. The more space between the strips, the faster and more efficient the drying will be. The meat will turn from red, to light brown, then to a dark brown color when it’s done. You really want to be sure the meat is completely dehydrated, but without turning it into shoe leather.
Notes
- You can scale this recipe… I typically do a 6-8 pound batch at a time, since that is about what the top rack of my oven can accommodate.
- About half way through the dehydration process, I wash my hands well and use a clean kitchen scissor to strip the meat into long, 1″ strips. This not only speeds up the dehydration process, but creates a portion controlled size. I re-hang the meat and complete the dehydration. After dehydration, I cut the strips in half again length wise, so that each piece is about 3/4″ wide x 6″ long – The perfect size for storing in Mason jars, Lunch Baggies & Easy for little mouths to chew.
STORAGE:
- One of the best features of beef jerky is its ability to store for longer periods of time without going bad. However, you still want to be VERY careful when storing it, so that bacteria isn’t given a chance to grow. I typically store enough in a Quart Sized Mason Jar (left on the counter) to snack on for a day or two. The rest is portioned out into Food Saver Bags & sealed well before storing it in our pantry. The jerky usually gets eaten quickly, but I imagine that it would be good for 1-2 months if sealed properly.
- If you don’t have a Food Sealer, then store the beef jerky in Mason Jars or Ziplock bags in the refrigerator for 1-3 months. Discard immediately, if you see any mold, discoloration, odor, or spoilage.
Nutrition
- Serving Size: 1 Piece
- Calories: 65


I’m looking forward to trying this! I have a daughter that is staying away from soy, so I was excited to find this recipe!
Pretty good,a but too sweet for my taste, if you prefer sweet over savory you’ll probably like it
Thanks for the feedback Josh! Feel free to back off or eliminate the sweetener. If you’re looking for a Gluten Free Teriyaki alternative, try Coconut Secret Teriyaki, it makes delicious Jerky too! God bless! ~Erika
I followed this recipe except for onion, as we have allergy to that, add I added a tablespoon of balsamic vinegar. It was good! A little set for my taste, but not bad. I’ll probably reduce the sugar next time and increase the salt a bit. Great base recipe. Thanks.
★★★★
Have you ever had it go bad? How long does it last? I am going out of town in a few months, and I have a lot of severe food allergies, so I am trying to find some quick protein options.
Is it safe to use this recipe ith chicken breasts?
Thank you.
Carol