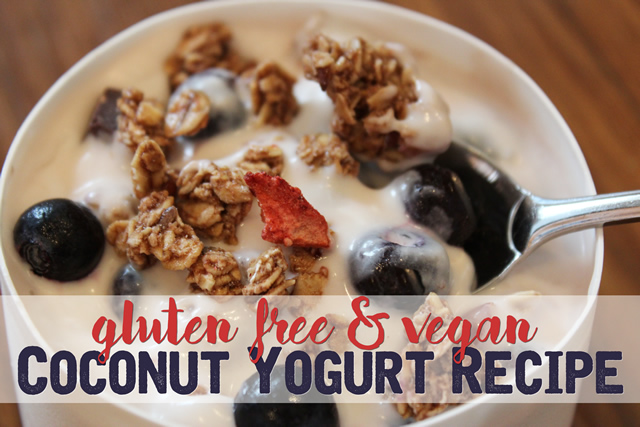
 This is the easiest homemade Coconut Yogurt Recipe I have ever tried! It’s completely Vegan and of course it’s also Gluten Free, Refined Sugar Free & Delicious! Plus, it’s a fraction of the cost vs. buying the little cups in the store.
For years, I made my other Coconut Yogurt Recipe – Although my family gobbled it up, I never really cared for it because of the strong beef gelatin & honey flavor. I just wanted a basic yogurt that I could top with my favorite Raw Cereal. This new recipe does the trick & everyone loves it!
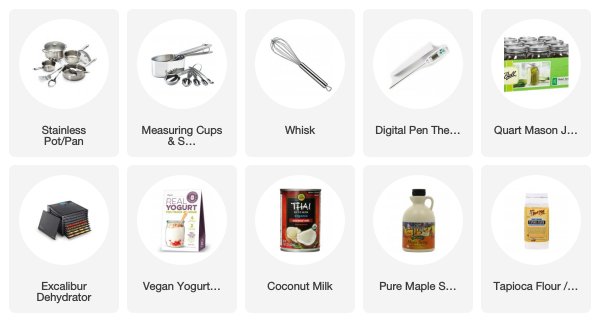
Here are the tools & ingredients used in this recipe:

The BEST Vegan Coconut Yogurt Recipe – Super EASY!
- Prep Time: 5 mins
- Cook Time: 8 hours
- Total Time: 8 hours 5 minutes
- Yield: 2 Quarts 1x
- Category: Snack
- Cuisine: Vegan
Description
This Vegan Coconut Yogurt Recipe is the EASIEST homemade yogurt recipe! Plus, it’s Gluten Free, Tastes Amazing & Saves Money! Top it with your favorite granola, fruit, nuts or flavors & enjoy!
Ingredients
- 4 Cans Coconut Milk – Full Fat (13.6 ounce cans – All Natural)
- 1/4 Cup Maple Syrup (or any Natural Sugar – Honey or Date Sugar will work too, but I love the flavor of Maple Syrup best)
- 1/4 Cup Tapioca Starch (aka Tapioca Flour)
- 1 Packet Vegan Yogurt Starter (my favorite is this one from Cultures for Health)
Instructions
- In medium sized pot over medium heat, whisk together the Coconut Milk, Maple Syrup & Tapioca Starch & bring to 140 degrees Fahrenheit (I use a cooking thermometer for all my baking) – This takes about 5 minutes.
- Remove pot from heat & set aside to cool until the temp is reduced to 110 degrees (this takes about 20-30 min – I place the pot on a cooling rack & whisk it frequently to cool it down faster). This cooling step is crucial so you don’t kill your yogurt culture later.
- While your mixture is cooling, prepare 2 Mason Jars – Quart Sized (or 4 pints) by filling 1/4 full of water (you will NOT use this water for the recipe) and bringing to a boil in the microwave (this takes about 3-5 minutes) – be sure the jars are uncovered. This will sterilize your jars to prevent bacteria growth. Remove carefully, pour out the hot water & set-aside.
- When the mixture temperature reaches 110, whisk in the packet of Vegan Yogurt Starter Culture – stir well.
- Divide the yogurt mixture into your sterilized Mason Jars and screw on lids to finger tight.
- To culture the yogurt, you have a few options: You can use your oven; a yogurt maker; InsantPot; or dehydrator. If the weather is really warm, you can even leave the jars out to culture. Oven Instructions: Warm your oven to the lowest setting (usually 170 degrees), then turn oven off. Place your Yogurt filled mason jars in a pot & wrap it in a large towel to insulate them. Place everything in your oven for 6-8 hours – Use the oven light for added warmth during the culturing process. Dehydrator Instructions: Place the jars into your dehydrator (I use an Excalibur 9-Tray with Timer) and set the temperature to 105 degrees Fahrenheit & culture for 6-8 hours. If using a Yogurt Maker or Instant Pot please consult your user manual & follow the instructions for culturing yogurt.
- Once the yogurt has cultured 6-8 hours, place the jars immediately in the fridge. Let yogurt set overnight. Yogurt should be thick & creamy!
Notes
Recipe can easily be halved or doubled! Just be sure to adjust the amount of Yogurt Starter you use.
FLAVOR & SERVING IDEAS:
I recommend stirring in your flavors (stevia, natural fruit preserves, chocolate, vanilla, dried fruit, etc) or toppings (granola, fresh fruit, nuts/seeds) right before you eat it. Here are some of our favorite combos:
- Chocolate Coconut – Stir in Unsweetened Cocoa Powder with a little Vanilla Stevia (start with 2 drops and work up from there). Top with fresh Strawberries, Bananas or Cherries.
- Black Cherry – This one is my favorite! Just add a few drops of Natural Cherry Flavoring with frozen Black Cherries & stir… Add a few Almonds & Chocolate Chips & it makes the best Frozen Yogurt!
- Strawberry Swirl – Mix in a tablespoon on your favorite Strawberry preserves and serve with your favorite Granola.
- Ch, Ch, Ch, Chia – Mix with Fresh Blueberries, Vanilla and a teaspoon of Chia Seeds.
- Pina Colada – Mix with Strawberries and Pineapple – topped with shredded Coconut. A-L-O-H-A!
- Fruit Dip – Use the Yogurt with your choice of mix-ins a a yummy fruit dip.
- Frozen Yogurt – Make your favorite flavors into a yummy frozen treat or popsicle!
- Sweetening – For added sweetness, try a little Maple Syrup, extra Honey or Liquid Stevia (which there are several flavor options) – but, start with just one drop and work your way up from there.
Nutrition
- Serving Size: 6 ounces
- Calories: 75
Whisk all ingredients (except Yogurt Cultures) in your pot. Heat to 140-150 Degrees – This kills off the bacteria that could compromise your yogurt cultures.

Cool Mixture to 110 Degrees.
Once Cooled, Add Yogurt Culture Starter & Whisk well.
Pour Prepared Coconut Yogurt Mixture into Prepared Jars. The mixture will be runny.
Screw Lids on lightly & Place in Dehydrator or Yogurt Maker. Set Dehydrator Temp to 105 degrees Fahrenheit for 6-8 Hours. Remove & place in fridge – Yogurt will still be runny, but thickens as it cools.

Once it chills & thickens, top with your favorite flavors & toppings… My personal favorite is Black Cherries (I buy mine frozen from Costco) stirred in with a couple of drops of Natural Cherry Flavoring – Topped with Superfood Cereal. Enjoy!


Erica, I halved your recipe for my 1-quart Salton yogurt maker, though accidentally used a full packet of the Vegan Yogurt Starter. The only surprising result (after cooking and then the chilling in refrigerator overnight) was a solid layer on top and liquid layer on bottom. (The Cultures for Health literature says that’s usually an indication of over-culturing or culturing at too warm a temperature, which doesn’t seem to be the case here.) Before serving/eating, would you advise removing the solid layer or breaking it up/whisking until mixed in?
Hi Lisa! It sounds like you did fine… the separation with Coconut milk can occur when the fat rises to the top. (you can see a photo of it in my other traditional yogurt recipe here). You could strain off the fat for a extra creamy yogurt, but I tend to whisk it all back together before putting it in the fridge to set. I don’t think using the full packet makes any great difference, other than your yogurt should be full of great culture! =) Enjoy & God Bless! ~Erika
Thanks for the quick reply, Erika–much appreciated. The link to the prior yogurt recipe was helpful. Am a little confused, though, about the timing of the suggested whisk. I didn’t notice the fat on top (solid layer) until after the yogurt had chilled. From your 9th and 10th photos (at the link), it looks like the whisk occurred after (rather than before) putting it in the frig. to set.
Erika did you ever try to “transfer” cultures from a plain coconut yoghurt to the milk or are you allways using the vegan culture starter. I know it’s possible with normal yoghurt just wondering if it’s an option to save money on the coconut yoghurt.
Hi Nina! Great question! I haven’t tried transferring the cultures, because according to Cultures for Health (my favorite place for all things cultured), the Vegan culture is weaker… So, I just start with a new batch each time. However, now that I’m feeling more confident with culturing, I might try it! Let me know if you do & how it goes! =) God Bless! ~Erika
Have you checked the true ingredients in that brand of coconut milk? Not at all, pure. The only one I’ve found so far is Natural Value, BPA free and organic. It’s amazing to be vegan, but we still need to watch the chemicals, GMO’s and other excepients that are making us all sick.
Hi, I am curious how long the yogurt will keep for in the fridge? Thanks!
If you are starting with full fat coconut milk (in which 1/3 cup serving equals 120 calories) then how does your yogurt end up only being 60 calories per 6 ounces??
[…] Healthy Granola Parfait from Yummy Healthy Easy […]
Can you use probiotic capsule instead of cultures
Instead of vegan yogurt cultures?