
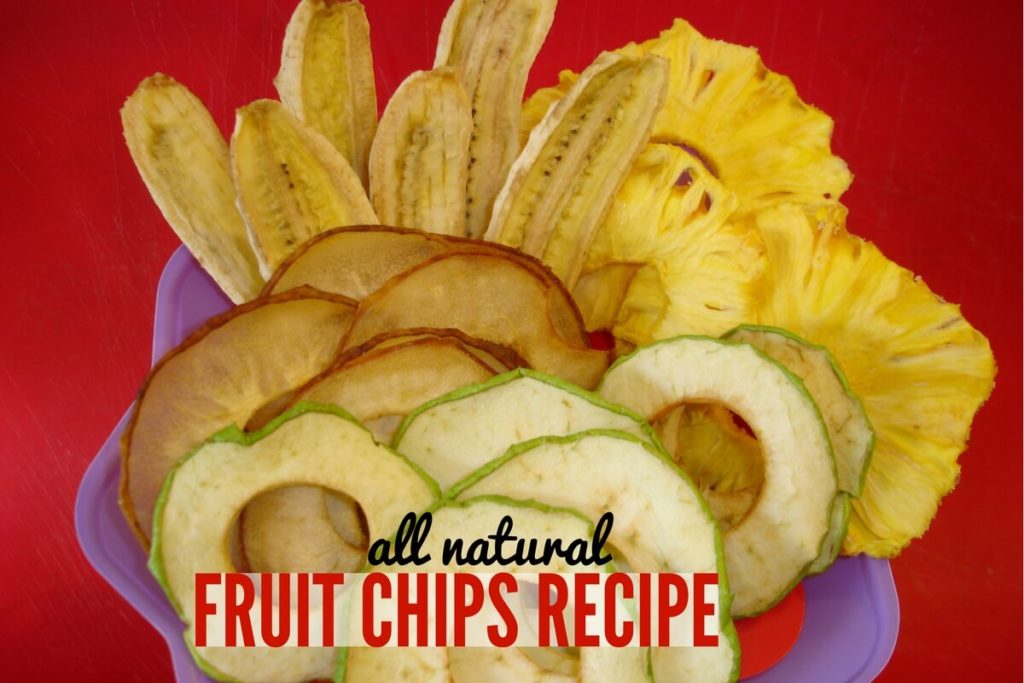
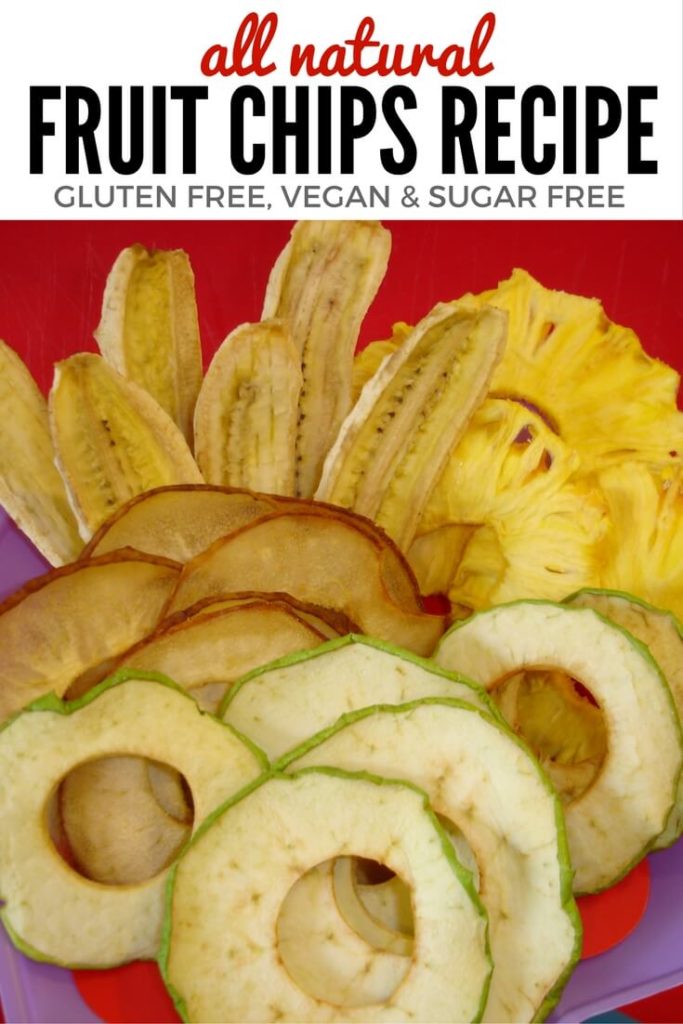
 Most store bought dehydrated fruit is soaked in sugar and preserved with sulfites… Some are even deep fried. Plus, they’re typically not fresh & can be outrageously expensive. This Natural Fruit Chips Recipe for the Dehydrator is easier and much less expensive than you think. They taste like the real thing, because that’s exactly what they are!
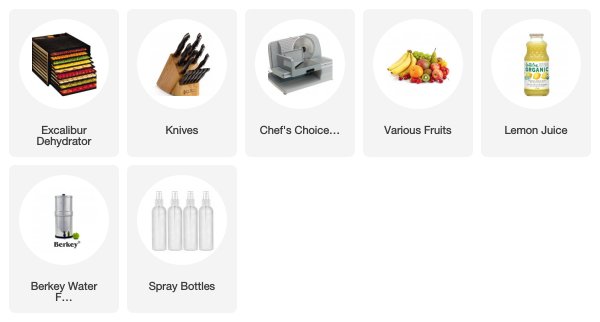
If you don’t already have a Excalibur Dehydrator, I encourage you to check out what this awesome Dehydrator is capable of! It’s made in the USA, has an outstanding warranty, and is the most popularDehydrator because of it’s large, efficient design and low cost to run.
The Tools & Ingredients Used in this Recipe:
Natural Fruit Chips Recipe in the Dehydrator – Gluten Free & Vegan
- Prep Time: 20 mins
- Cook Time: 12-18 hrs
- Total Time: 20 minute
- Yield: Varies
- Category: Snacks
- Cuisine: Gluten Free
Description
This All Natural Dried Fruit Chip Recipe is so much fun! It’s Gluten Free & Vegan and so much fun to make in your dehydrator.
Ingredients
Scale
Fruit Suggestions:
- Apples – Dehydrating Time: Approx. 8-10 hours*
- Pineapples – Dehydrating Time: Approx. 12-20 hours*
- Bananas – Dehydrating Time: Approx. 12-20 hours*
- Pears – Dehydrating Time: Approx. 8-10 hours*
- Strawberries – Dehydrating Time: Approx. 8-10 hours*
- Mango – Dehydrating Time: Approx. 12-20 hours*
- Papaya – Dehydrating Time: Approx. 12-20 hours*
These are just suggested ingredients for dehydrating fruit and drying times – feel free to experiment with it! Almost any fruit will dehydrate!
Lemon-Water Solution:
- 1 Part Pure Lemon Juice (no sulfites and not from concentrate)
- 3 Parts Water
Instructions
- Prepare Lemon-Water Solution by combining Lemon & Water in Spray Bottle (any unused portion can be stored the fridge for future use.)
- Using a very sharp knife or Food Slicer
, slice fruit as evenly as possible in the desired thickness…. Remember that fruit will shrink as they dehydrate, so the higher the water content, the smaller the final product will be. (For best results, it is important to use a stainless steel knife/blade when cutting your fruit – otherwise, you will have bruising/browning of fruit.)
- Layer sliced fruit on your Dehydrator tray/screen. Do not overlap fruit.
- For non-citrus fruits, spray generously with lemon water solution (you only need to do the tops).
- Place trays in Dehydrator and set temperature to 115-120 degrees (you can do it higher, but the nutrient loss will be greater).
- If your Dehydrator has a timer, set timer for approximately 10-12 hours and check fruit regularly for desired doneness. Rotate trays if necessary and set-timer so that the fruit will not over dehydrate.
- Store finished fruit in an airtight container (ie. mason jar, ziplock bag, etc…). Keeps best in fridge, and even longer if using a food sealer.
Notes
* Drying times will vary depending on your humidity and dehydrating temperature.


Hello there!
I just found your website and I noticed that we live in the same state, and I was wondering if you could email me with some tips on dehydrating in this weather while still maintaining raw integrity but without fermentation.
Thank you,
Blake
Aloha Blake!
Since we live in the same state of Hawaii, then you should be able to follow the dehydration suggestions I make on my videos without any issue of fermentation.
If you are trying to maintain as much nutrients as possible, then you will want to keep the dehydrator’s thermostat at 115 degrees or below. Some raw foodies will suggest drying temps at or below 110 or 105 degrees – and that will work for some things in our humidity. However, I’ve found that 115 degrees works well and prevents any mold growth.
Hope that helps!
God Bless!
~ Erika
i would like to know the tool you used in slicing the Banana.
Thanks
Aloha Nicholas!
I’m using a EdgeCraft 610 Chef’s Choice Meat Slicer… you can find our more info about it on Amazon – I’ve placed a link in the blog post above.
God Bless!
~ Erika
I used your recipe and these are now in the Excalibur! Thank you!
Oh Erica…please help! I’m desperate! I just purchased the Excalibur and nothing has turned out right except for my kale chips :( I tried making veggie chips out of snap peas and green beans. I dehydrated them for 24 hours at 105 degrees (checked on them constantly). They were not even edible. My bananas and apples turned out much too chewy. I’m not sure I’m going to keep the dehydrator anymore. Apples and bananas are already portable. I really want to make portable veggie snacks with yummy seasonings. Any suggestions?
The next time you make these will you show some pictures of the finished product? Thanks so much!
Leigh-Anne
Hi Leigh-Anne!
Don’t lose heart! My first time experimenting with my dehydrator wasn’t always what I expected either. By sticking to some recipes, you’ll be a pro dehydrator in no time!
The reason your snap peas and green beans did not turn out is for two reasons: 1) They are not edible once dehydrated (like the snack ones in the bag that are deep fried in oil); they must be soaked or cooked to restore them to an ‘edible’ food once dehydrated. 2) Some greens require that you blanch them in boiling water before dehydrating to preserve them properly – however they still need to be soaked before they can be eaten again. A dehydrated bean will be hard as rock for proper preservation.
If you are a Raw / Whole Foodie who wants the nutritional value of Raw Veggie Chips, you would need to blend the cooked/soaked beans in your blender with other ‘binders’ that can help create more of a chip or cracker that is edible. However, peas & green beans are not the best choice for this – I would stick with green leafy veggies, nuts, tomatoes, flax meal, salt, carrots, dates, etc… for the best outcome. A great resource for Raw Cracker Recipes is the ‘Krazy Kracker Lady’ & for Dehydrator Tips try, ‘Dehydrate2Store’ on YouTube.
There are several reasons your fruit may not have turned out… the first thing I would check is to see if the heating coils are working properly on your Excalibur. When I bought mine, I had to follow the instructions included in the manual to ‘push on the coils’ to re-set the temperature gauge (since they can shift during shipping). This solved the problem immediately and I’ve never had to do it again in over 4 years.
The other possibility is that your fruit was sliced to thick and/or needed more time and/or a higher temperature (due to cold weather / humidity).
If you still have problems after trying the things I suggested, I would recommend calling Excalibur – they are wonderful and will be willing to walk you through some of the basics.
I hope this helps… let me know how things go. I’m sure once you try it again, you’ll get better and better each time.
God Bless!
~ Erika
Any ideas on how to make fruit leather? I have lots of pears getting soft real fast!!
Thanks
Yes, ironically, I have a fruit leather / roll-up recipe I’ve been working on. It should be ready in the next couple of days – although I’m sure you’ve had to do something with those pears by now. If you ever have fruit going bad, you can always freeze them and use them in the dehydrator or smoothies later. =)
God Bless!
~ Erika
Hi Erika,
Just wondering, the estimated times you put – are those the length of time for a crunchy texture or chewy texture? I’m hoping to get crunchy apple chips; wondering if that’s actually possible.
Thanks for the recipes!
Cheers
Jesse
Hi Jesse!
The dehydrating time varies on the type of fruit, but for apples, it usually takes about 18 hours to get them more ‘crunchy’… but the only real way to know is to keep testing them along the way. =) But bare in mind that dehydrated foods often crisp up a bit once you pull them out of the dehydrator. And to keep them crispy, be sure to store them in an airtight container in the fridge… or food seal them for the longest pantry storage.
Hope that helps! God Bless!
~ Erika
Hey Erika, I have had my Excalibur for over a year now yet I still cannot produce crisp banana and/or apple chips. I am glad that I love them chewy, so I am not sad. I am only bothering you because I would like to try them as a crisp treat.Thanks=)
Hi Lakisha!
I get this question a lot. The super crisp banana/apple chips like you find in the store are typically freeze dried (like the brand ‘Just Tomatoes’) – which is done commercially and strips many of the nutrients from the fruit or veggies. Some stores also sell fried versions of these fruits – but again, they are not fresh.
But, you can get apples & bananas to be pretty crispy if you slice them thinly… which is why I use a food slicer.
Hope that helps! =)
God Bless!
~ Erika
Thanks for this video Erika. I dusted off a Bosch food slicer I inherited from my mother. One thing I was wondering is whether you’ve ever used a food slicer to prep hard squashes, especially butternut squash? I love homemade butternut squash soup but can’t always find it in season. So I was thinking of prepping some for freezing. Do you think these hard squashes would work with the foot slicer? Thanks in advance.
Erika, I really like your Web site–well designed and informative. Definitely appreciate you. My question is about the food slicer thickness-control settings (0 to 20). You shared that No. 5 is your choice for slicing apples. Would you give your choice for slicing other foods (e.g., pineapples), please? Would really appreciate it.
Hi Lisa!
Thanks for your comment! 5 Is my favorite setting on the Food Slicer for Apples & Pears, 3/4 for Bananas if slicing lengthwise or 5/6 for Medallions, 10+ for Pineapples, and I think it’s 15 for Bread slices. Hope that helps! If I think of any others, I’ll let you know! =)
God Bless!
~Erika
Go to the website dehydrate2store.com to learn everything you need to know about dehydrating. It is the best site I have seen.
Hello i am interested in making dry fruits and veggies as for tea.. shoyld i dehydrate them chewy or need to have it more crispy?